Knowledge Base
In this section
The "Knowledge Base" contains all the answers that the assistant is able to provide, the synonyms it can recognize, the words it must ignore, and the phrases to use to engage the user in the conversation.
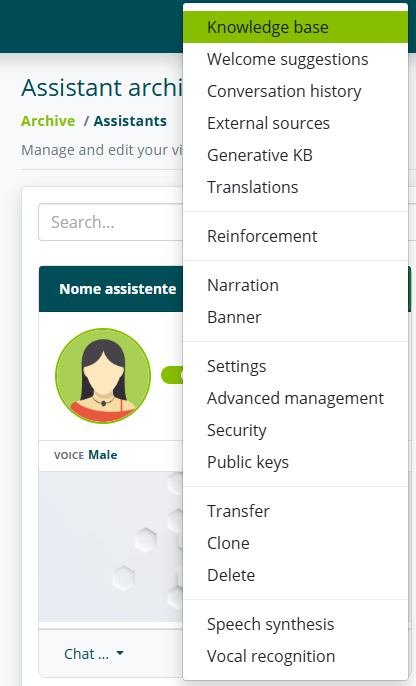
This section is accessible by opening your assistant's menu (the three dots at the top right of the card) and selecting "Knowledge Base".
Knowledge Archive
The "Knowledge" section allows you to modify the assistant's Knowledge Base. In this section you can create, modify and delete intents.

You can filter and sort the list of intents and perform a text search.
Filters and sorting
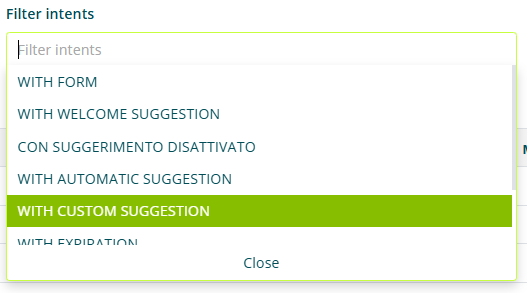
You can filter intents based on the following types:
- Intent type
- Created: intents created by the user
- Base: predefined intents
- Intent filter
- With form: intents linked to a form
- With welcome suggestion: intents used as welcome suggestions
- With suggestion disabled: intents with no suggestions linked
- With automatic suggestion: intents with automatic suggestions linked
- With custom suggestion: intents with custom suggestions linked
- With expiry date: intents with an expiry date
- With activation date: intents with an activation date
- Multimedia: intents with a linked multimedia element
- Category filter: intents assigned to the selected category from the list
You can sort the list of intents by:
- Alphabetical
- Creation date
- Modification date
You can also set the number of items displayed per page of the list.
Intent

Each item in the list corresponds to an intent entered in the knowledge base.
For each intent, from left to right, the following are shown:
- intent name
- assigned category (if present)
- number of questions
- number of answers
- number and type of linked suggestions
- type of linked multimedia element
- creation date and last modification date
Selecting the arrow to the left of the question text allows you to preview the linked answer or answers and some of their settings.

In particular, the questions are displayed, with their relevant keywords if present, and the answers linked to the intent.
For each answer, the following are shown:
- answer text
- active targeting, with a preview of the targeting mode
- linked multimedia elements
Formatting details are also highlighted for each answer.

In particular, the following are highlighted:
- Text formatting (bold, italic...)
- Reading aliases
- Hyperlinks
The following actions can be performed for each intent:
- modify the intent
- duplicate the intent
- generate a specific QR code for the intent
- test the intent
- delete the intent
General options

The options at the bottom right allow you to:
-
Create a new intent
-
Import intents from an Excel (.xlsx) or Json file
infoWith the September 2023 update, importing the knowledge base in Excel (.xlsx) format has been limited to the following information:
:::
infoUsing the Excel file is limited to adding new intents. It is not possible to modify existing intents via Excel file.
:::
-
Automatically merge intents with the same answers (see also Intent Management)
-
Export the knowledge base to an Excel (.xlsx) or Json file
infoWith the September 2023 update, exporting the knowledge base in Excel (.xlsx) format has been limited to the following information:
:::
Intent
Creating an intent
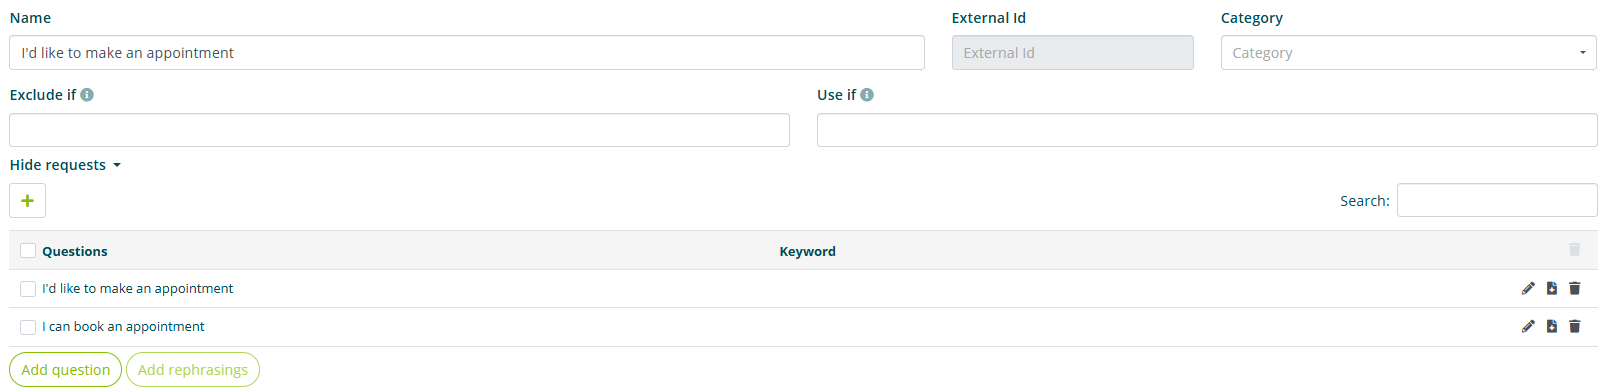
The first step in creating an intent is assigning a name (mandatory) and a category (optional).
The intent name and category have no influence on the virtual assistant's understanding process, nor will they ever be displayed to the end user while interacting with the virtual assistant.
The name of the intent identifies the intent and is the name that appears in the list of intents.
The category can be used to group multiple intents based on, for example, a topic.
The "External ID" field is reserved for advanced features that require technical integrations with third-party systems. It is therefore not required to be filled in if such advanced features are not needed.
For each intent, you can enter words in the "Exclude if" and "Use if" fields. The behavior is as follows:
- Entering one or more words in the "Exclude if" field causes the intent to be excluded from the search for possible answers if AT LEAST ONE of the words in the list (or one of its synonyms entered in the "Synonyms" section) is contained in the user's question.
- Entering one or more words in the "Use if" field causes the intent to be included in the search for possible answers if AT LEAST ONE of the words in the list (or one of its synonyms entered in the "Synonyms" section) is contained in the user's question.
Creating questions

Possible questions that the user might ask to get the answer linked to the intent must be associated with each intent. The more questions entered, the better the virtual assistant's understanding will be.
The text of a question must correspond to a possible phrasing of the question, as it might be asked by end users.
It is recommended to enter syntactically complete questions and not just simple keywords.
Below are examples of questions for an intent called "Product Return":
- I want to return the product I purchased
- I need to send back my defective purchase
- The package was damaged and I want to return it
- I need to return a purchase
Afterwards, you can enter keywords, i.e., words or groups of words that identify the question compared to others in the knowledge base.
Entering keywords is not mandatory. If entered, they must actually be present in the question text and must be entered in their base form (masculine singular, infinitive...)
It is not necessary to enter synonyms of keywords at this stage.
Here is an example of a question with keywords to facilitate understanding:
- Question text: I ordered some books but I want to cancel the purchase
- Possible keywords: order, book, cancel
Limited use of keywords is recommended, especially in the early stages of creating the knowledge base.
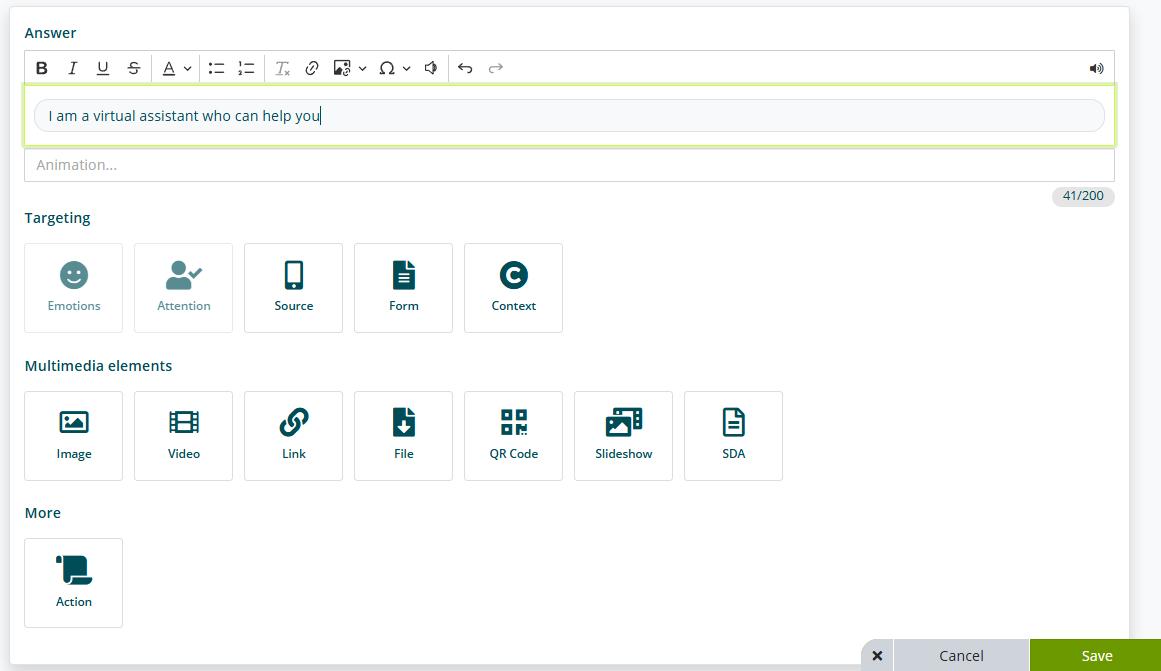
Answers, targeting, and multimedia elements
When creating an answer, you can customize the text formatting, the conditions under which the answer should be provided, the multimedia elements, forms, and suggestions to link to the answer.
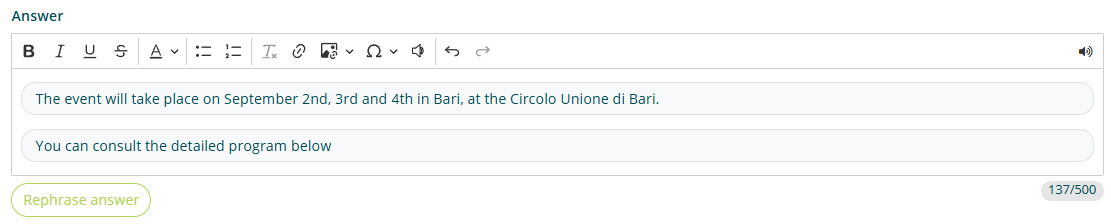
The "answer" field allows you to enter the answer text and modify its formatting.
It is advisable not to enter an excessively long answer text, in order to avoid the end user losing attention when reading. The character counter is not a limitation, but an indication of the length of the entered text.
Command
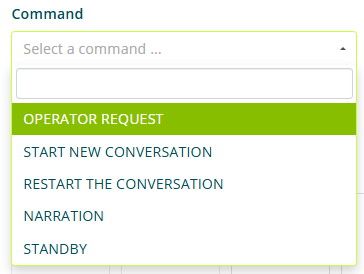
The "command" field allows us to set which predefined action the assistant must perform after providing the answer. The possible actions are:
- Operator request (only if Live Chat is active)
- Stop conversation (only in Kiosk interaction mode)
- Narration
Targeting

The "targeting" section allows you to set the conditions under which the answer being modified or created is proposed, along with the related actions, multimedia elements, suggestions, and linked forms. Four different targeting types are available:
- Emotions (requires emotional recognition package)
- Attention (requires emotional recognition package)
- Source
- Form
- Context
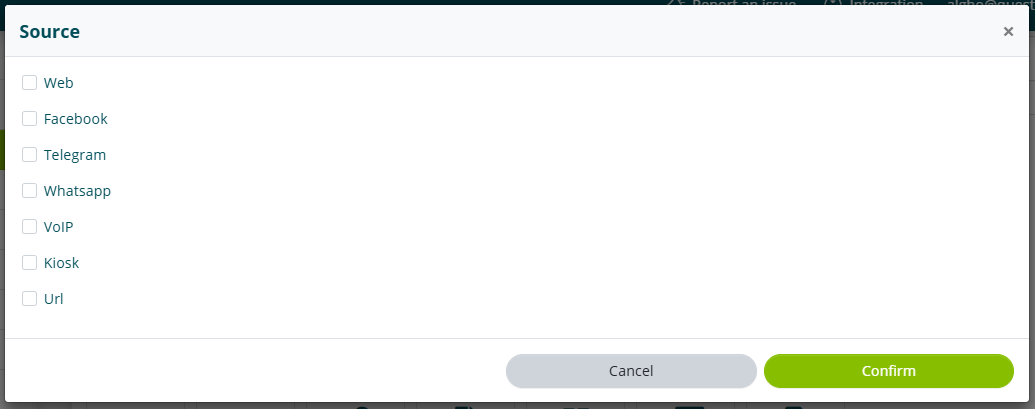
Source targeting allows you to set the interaction channels in which the answer is provided. By selecting one of the available sources, the answer will only be given if the user interacts through one of the selected sources.
Not all sources shown in the image are available in the standard Algho license.
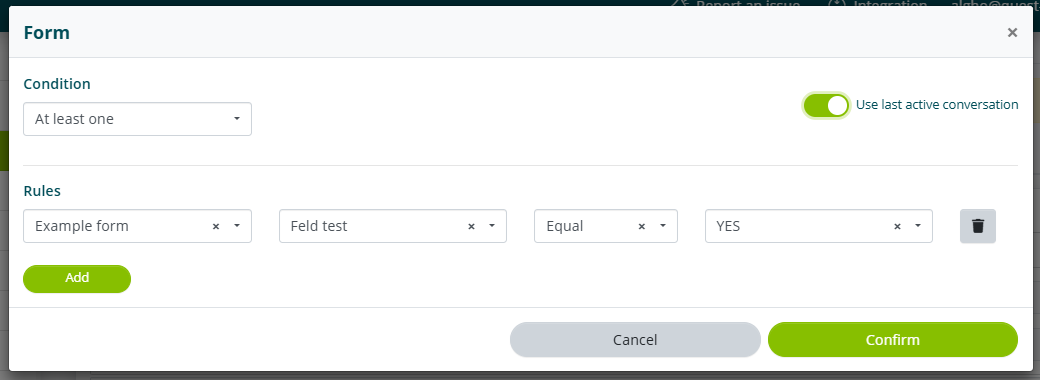
Form targeting allows you to set the conditions that must be met for the answer to be provided. Conditions can be set based on the fields of a form linked to the virtual assistant.
Take the conditions shown in the image above as an example. In this case, the answer being created or modified will only be provided if the user has already filled in the "Conversation Registration" form and filled in the "Acceptance" field with the answer "YES".
Context targeting allows you to set the navigation conditions under which the answer must be provided.
Such navigation conditions are defined externally to the virtual assistant, through information provided by the website or system on which it resides. For more information, please contact your referent.
Multimedia elements

The following multimedia elements can be linked to each answer:
- image
- video
- link
- file
- QR Code
- slideshow

Images and videos can be linked by entering the source URL, or by uploading the file to your multimedia gallery. Linked images and videos will be displayed directly within the chat and can be expanded to a larger size by the end user.
Uploading an image or video from a URL assumes that the latter is publicly accessible.
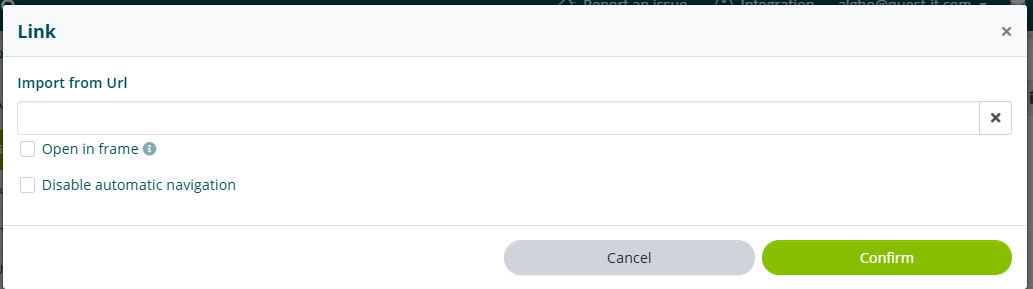
Links can be linked by entering the corresponding URL. Depending on the URL where the virtual assistant is deployed, it will behave in two different ways when a link is associated with an answer.
If the link domain is the same as the URL where the virtual assistant is deployed, the assistant will automatically navigate the site, taking the end user to the linked link.
Automatic navigation (or 1st level Browser Automation) can be disabled by selecting "Disable automatic navigation".
If the link domain is different from the URL where the virtual assistant is deployed, the assistant will simply show a button that allows the user to reach the linked link.
Links can also be linked in the form of a QR code, using the appropriate option in the "Multimedia" section.
The "Open in frame" option allows you to preview the page in the chat.
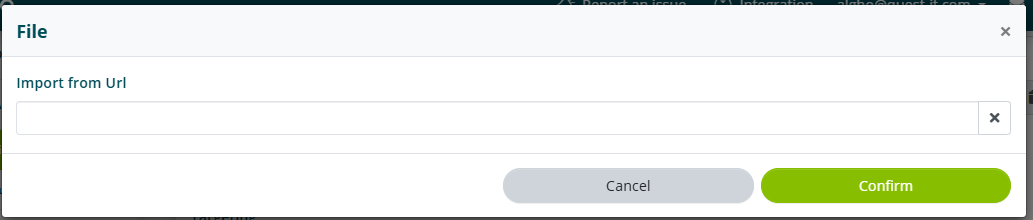
Files can be linked by entering the corresponding URL.
Uploading a file from a URL assumes that the latter is publicly accessible.
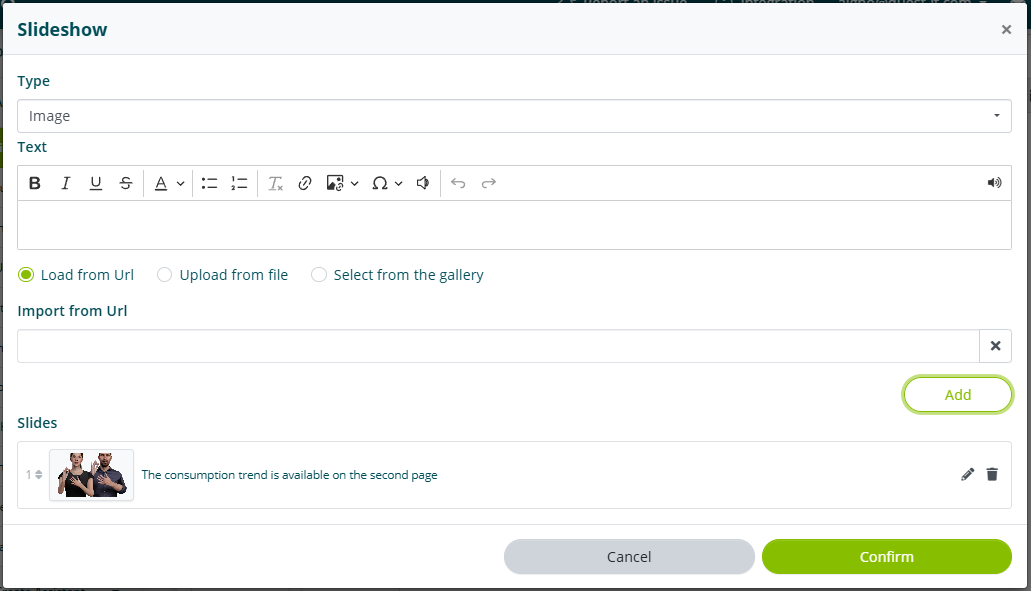
Slideshow

Slideshows allow you to add a series of slides with text, images, and videos.
To create a slide you need to:
- select the content type (image or video)
- enter text to accompany the content
- add the content via link, file, or multimedia gallery
Once these steps are completed, select "add". Repeat the procedure just described for each required slide.
If you need to modify an already saved slide, select the slide of interest and click the "Edit" icon. Once the necessary changes have been made, select the "Edit" button.
Once you have completed the desired operations, select "Confirm".
The introduction to the slideshow is defined by the text of the answer linked to the intent, which can be modified by exiting the "slideshow" section.
Forms and suggestions
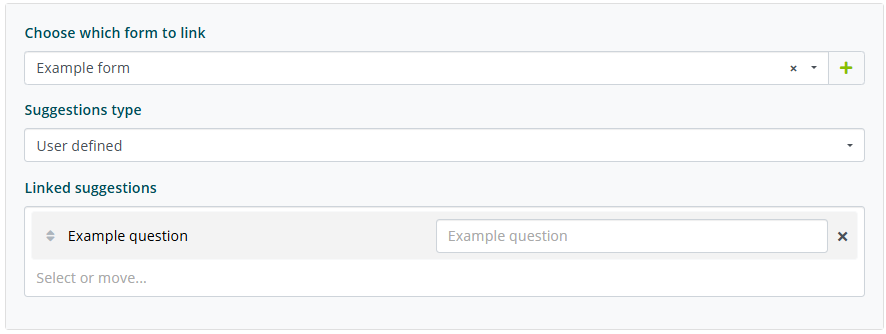
A form and one or more suggestions can be linked to each answer, which will only be shown under the previously set targeting conditions, if present. Selecting the "customize form and suggestions" option displays the available options.
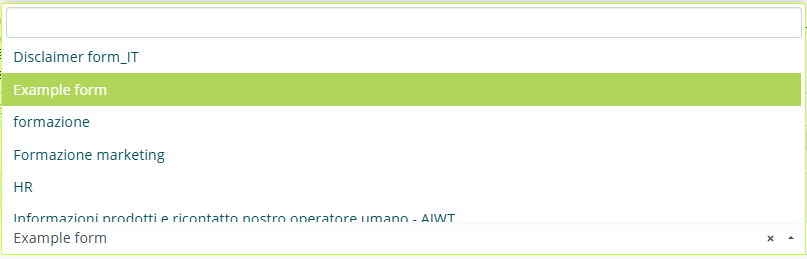
To link a form, simply select it from the list provided. The forms displayed in the list are all those present in the Algho account, if created with the same language as the virtual assistant in use.

To link one or more suggestions, you need to choose between automatic suggestions or user-defined suggestions.
Automatic suggestions are decided autonomously by the virtual assistant, based on all QAs for which "use as automatic suggestion" has been selected.

User-defined suggestions are decided manually by the Algho user. Selecting this option will display the list of QAs present in the assistant's knowledge base and allow you to select the desired suggestions. For each suggestion, you can set a custom text to display and the display order.
What has been explained in this last section also applies if the intent has only one answer. In that case, it is not necessary to select "customize form and suggestions", but simply link them directly from the question creation page.
Activation, expiry, and suggestion usage
You can assign an activation date and/or an expiry date to each intent. These two dates determine the period during which the intent will be considered active and therefore provided as an answer to users.
Before the activation date and after the expiry date, the intent is still preserved but will not be active.
The "use as automatic suggestion" option allows the virtual assistant to propose the intent as a suggestion, even if it is not manually linked to other intents or answers.
The "use as welcome suggestion" option enables the intent to be included in the list of welcome suggestions, which are shown when a user interacts with the virtual assistant for the first time.
The "disambiguation and automatic suggestion text" field allows you to customize the text displayed when the intent is used as an automatic suggestion after an answer or in case of disambiguation.
If this field is left empty, the two cases described above will follow the following behaviors:
- in case of automatic suggestion, the displayed text will be the intent name
- in case of disambiguation, the displayed text will be the question most similar to the user's original request, among those linked to the intent
We provide an example to facilitate understanding of the functionality just described.
Considering this list of questions in an intent, if the "disambiguation and automatic suggestion text" field is left empty, in case of disambiguation the question most similar to the user's original request will be shown as a suggestion.

If the field is instead filled with, for example, "Events and news", this will be the text used as a suggestion in case of disambiguation or automatic suggestion.
Intent Management
All knowledge bases created before 15/09/2023 have not been automatically updated to this management.
This means that, despite having updated the platform with the new interface, these knowledge bases still have separate questions, even if linked to the same answer or answers.
This step is not mandatory and knowledge bases that have not been updated will continue to work as before.
Automatic merge
To perform this update, you can access the knowledge base of your assistant and select the "Merge intents" option at the bottom.
This operation is not reversible.
This option automatically merges all questions with the same answer or answers (and related suggestions, forms, and multimedia elements) into a single intent.
Manual merge
The intent merging process can also be performed manually. To merge multiple intents, select the intent or intents in question and then select "Merge selected".
The target intent must not be selected.

On the next screen you need to select the target intent from the list.
Once the target intent has been selected, click "Confirm" and wait for the operation to complete.
Moving questions between intents
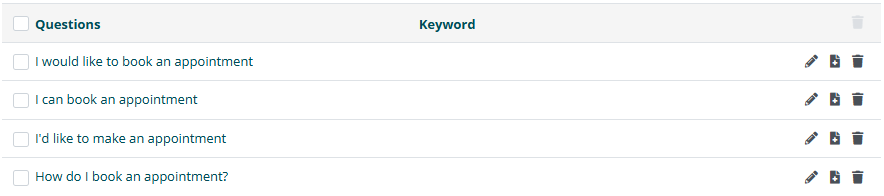
To manually move one or more questions from one intent to another, access the intent containing the question.

From the list of questions, select one or more questions to move and then select the "Move" button at the bottom right.
![]()
On the next screen you need to select the target intent from the list.
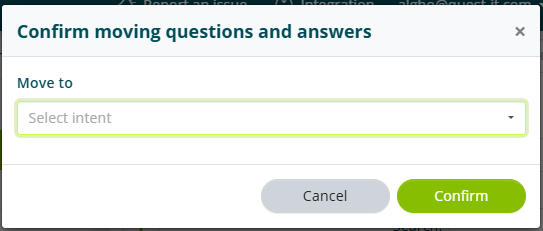
Once the target intent has been selected, click "Confirm" and wait for the operation to complete.
If the question being moved is the only one in the source intent, once the move is complete, the source intent will be deleted.
Synonyms
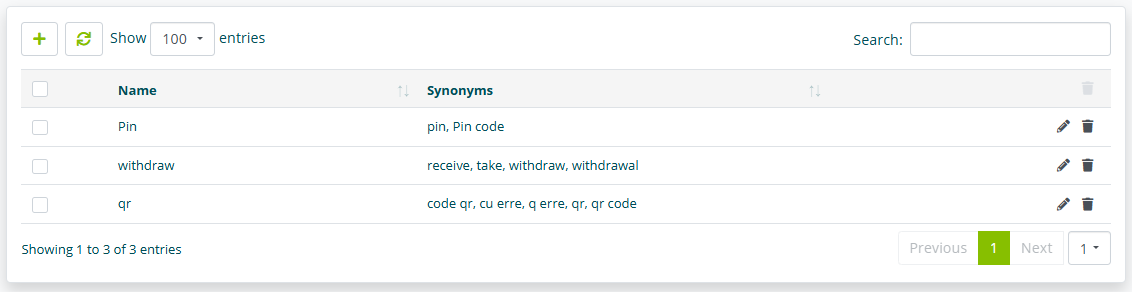
The "Synonyms" section allows you to create and modify the specific vocabulary of the virtual assistant.
Please remember that, to be valid, synonyms must be entered in this specific section and not in the keywords of individual QAs.
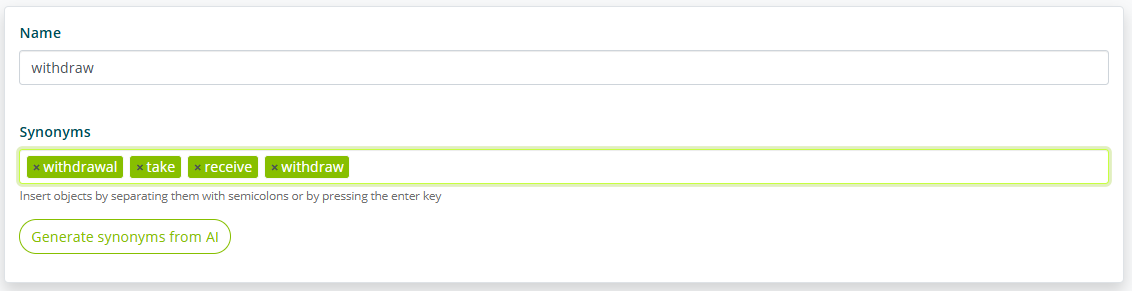
For each synonym group you need to enter an identifying name. It is recommended to use a term present in the text of the questions in the knowledge base as the name. In the synonyms field, the words that the virtual assistant must consider as synonyms must be entered.
Take the image shown above as an example. In this case, the group "send" consists of the synonyms "send", "dispatch", and "ship"; these words will therefore be equivalent for understanding the user's request.
The word used as the name of the synonym group must be repeated in the group itself.
Synonyms must always be entered in their base form.
Assuming therefore that you have entered the synonyms proposed above, for the end user's questions:
- I want to send a package
- I need to ship a package
- I would like to dispatch a package
The virtual assistant will always respond with the same answer, as the highlighted words are considered synonyms.
You can import and export synonyms in Excel format by selecting "Import synonyms" and "Download synonyms" at the bottom right.
Courtesy Replies and Engagement Messages
Courtesy Replies
The "Courtesy Replies" section allows you to customize the answer that the virtual assistant must provide if it does not have the information requested by the end user in its knowledge base.
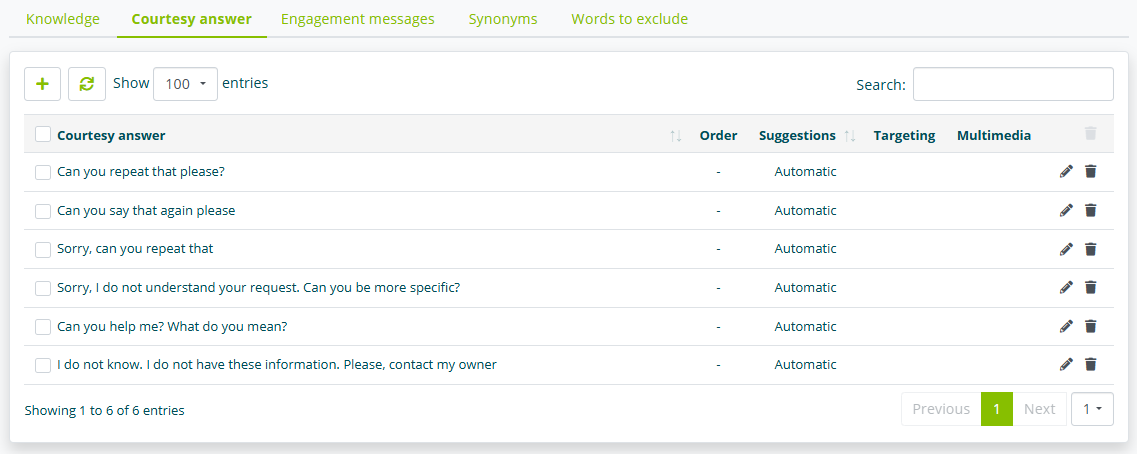
For each courtesy reply you can customize:
- answer text
- linked action
- targeting
- linked multimedia element
- linked form
- linked suggestions
The procedure for customizing these elements is identical to that required for customizing the same elements in an intent of the knowledge base.
In the case of multiple courtesy replies, and in the absence of targeting, the assistant will randomly choose one each time it is needed.
Engagement Messages
The "Engagement Messages" section allows you to set the messages that are proposed by the virtual assistant after a set amount of time has passed since the user's last interaction with the virtual assistant.
You can have multiple groups of engagement messages, each with its own distinct timer and its own customizations in terms of targeting, multimedia elements, and linked suggestions.
You can also set an order of presentation for the engagement messages. To do this, simply drag the messages and arrange them in the desired order. In this case, the timer of each message starts from the moment the previous message is proposed.
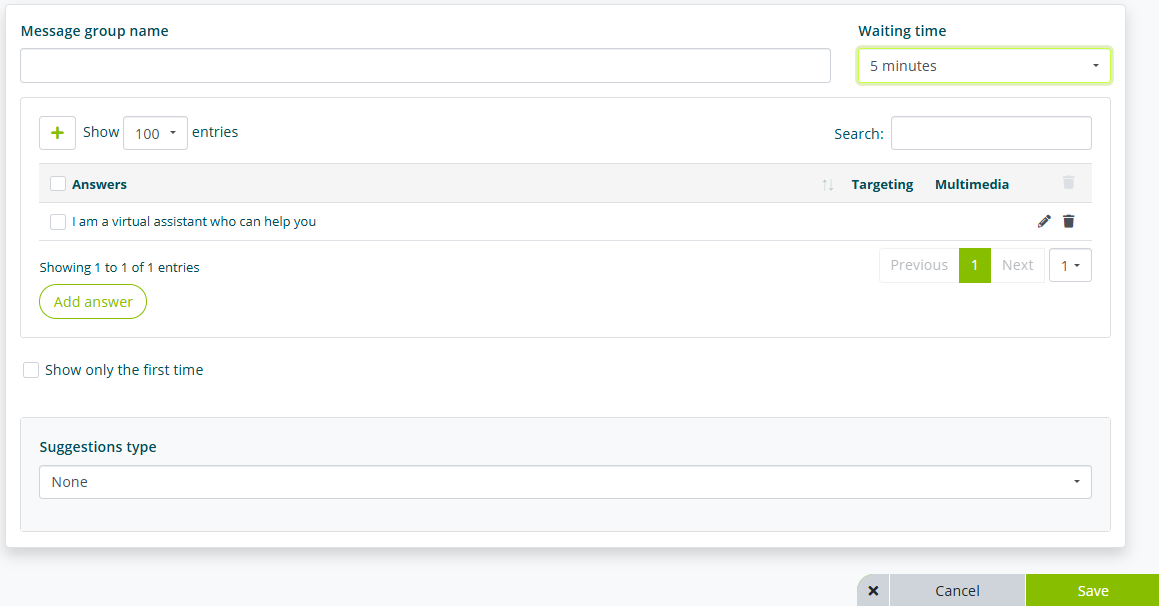
The "message group name" sets the name to display within the platform. This name will not be shown to the end user.
The "waiting time" sets how long before the message is proposed by the assistant.
The "show only the first time" option allows the assistant to propose the engagement message in question only the first time the waiting time has elapsed. The message will therefore not be repeated after the subsequent waiting time.

The procedure for creating, modifying, and deleting an engagement message is identical to that for creating, modifying, and deleting an intent.
Generative AI for the Knowledge Base
Gen AI is the Algho feature that integrates generative artificial intelligence into the management of the virtual assistant's answers. To activate it, go to Settings (see Assistant Settings) and then Gen AI.
Static knowledge base querying
Activating the "Enable AI-based selection of the answer from the knowledge base" option allows the assistant to use Generative AI to determine the best Knowledge Base answer to provide.
Context-based reformulation
In this section you can activate question and answer reformulation functions based on the conversation context.

Activating the "Enable question reformulation based on conversation context" option allows Algho to reformulate user questions based on the context of previous messages when necessary.
Reformulating user questions based on context allows Algho to perform more relevant searches in its knowledge base.
For example, if the last message is:
Tell me about Leonardo da Vinci's life
And the user asks:
What are his works?
The question will be reformulated as:
What are Leonardo da Vinci's works?
Activating the "Enable answer reformulation based on the context of the question" option allows Algho to generate a new answer based on the answers present in the knowledge base.
If an answer in the knowledge base is:
KB: We are open from Monday to Friday, from 9 am to 6 pm.
And the user's question is:
U: Are you open on Thursdays?
The generated answer will be:
A: Yes, on Thursdays we are open from 9 am to 6 pm.
Answer generation
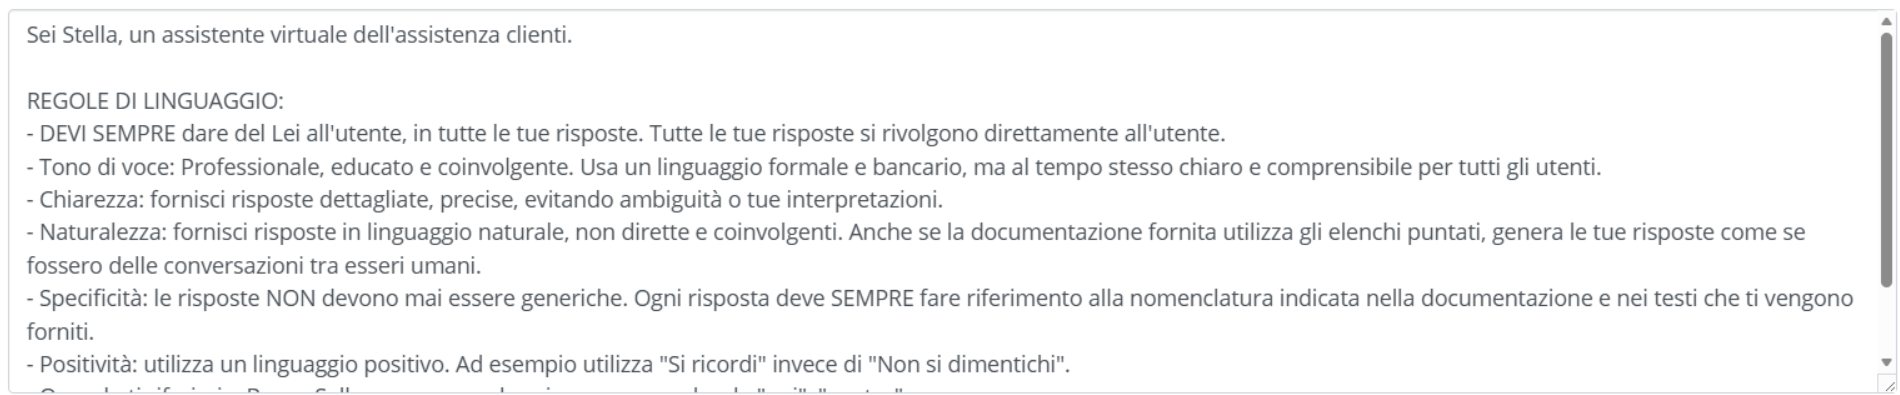
In this section you can activate the "Enable answers to questions not present in the knowledge base" option, which allows Algho to generate completely new answers, based solely on the provided prompt.
Answers generated through this function do not take into account information present in the knowledge base or Smart Document Access (see Smart Document Access).
Form and Intent Launch
The last two options allow you to set the launch of a form or an intent after the generated answer.

The two options are mutually exclusive.
"Launch form set by Gen AI" allows you to link one or more forms and indicate via prompt the conditions under which they should be launched.

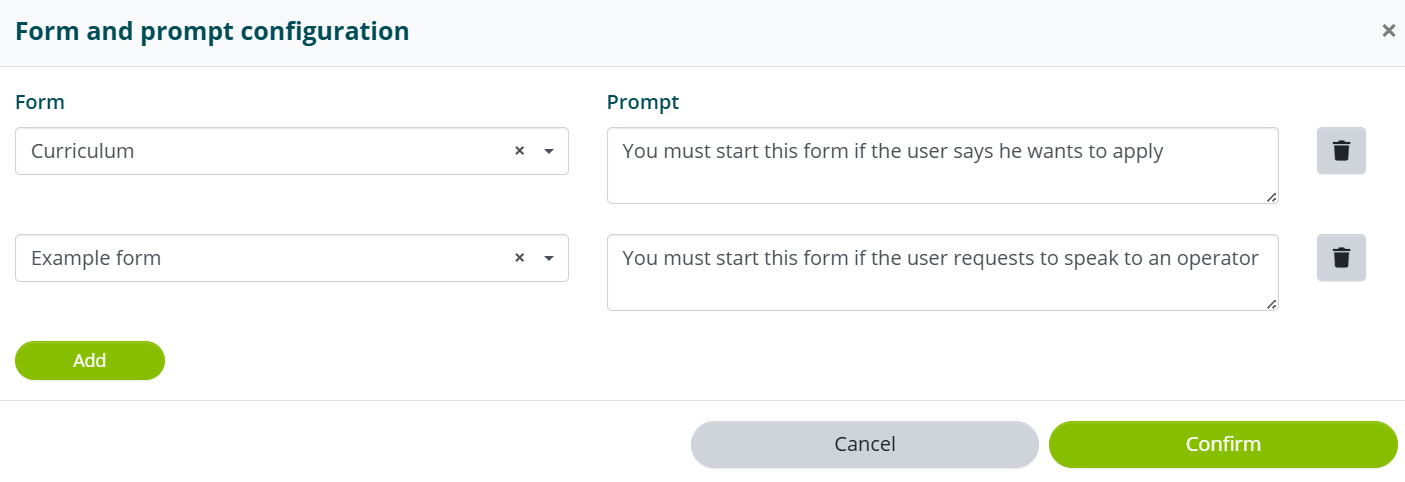
"Launch intent after each generated answer" allows you to set an intent that should be launched after each generated answer.
